There are 2 types of portraits in Stellaris: static and animated.
Structure[編輯 | 編輯原始碼]
Assets[編輯 | 編輯原始碼]
All Assets are located in \gfx\models\portraits.
Portraits and Portrait Groups[編輯 | 編輯原始碼]
What is being chosen as "the Appearance" for the Species of an Empire is called a "Portrait Group". Each Portrait Group may hold one or several portraits.
Each Portrait is defined by specifying:
entity: Defined in\gfx\models\portraits, in files named "xxxxxx_portraits.asset". They specify the mesh and animation used for the Portraitsclothes_selectorandhair_selector: Defined in\gfx\portraits\asset_selectors, about which hairstyle and clothing a Portrait chooses in different conditions.greeting_sound: Chosen from\sound, in various subfolders, they are the sound the Species will make when you open up a window. This entry may also be a collection, listed in\sound\category.asset. They represent different moods associated with the same "Species".character_textures: Chosen from\gfx\models\portraits, they are the dds files with the textures to be painted on the Mesh defined in the Entity.
A Portrait Group defines what circumstances which Portrait is used for the Species. It basically has 6 settings:
default: Controls if nothing if specified, which one Portrait to fall back to.game_setup: Controls which Portrait to display when we are creating a country in the Empire Selection screen.species: Controls which Portrait to display when the Species is seen in the Species Tab in the main game.pop: Controls which Portrait to display for the Pop of this Species when viewed in the Planet’s Tab.leader: Controls which Portrait to display for different Leaders of the country.ruler: Controls which Portrait to display for the Ruler of the country.
Other references[編輯 | 編輯原始碼]
Modded Portraits usually have wrong greetings and insults. Because the state of the Portrait Groups are located in \common\species_classes\00_species_classes.txt, 01_base_species_classes.txt and \common\scripted_triggers\00_scripted_triggers.txt.
In 00_species_classes.txt:
HUM defines every humanoid species. Anything not listed there (or modded to be listed there) will not be considered humanoids.
In 01_base_species_classes.txt:
The file defines all the names of the Portrait Groups. These Portrait Groups all would belong to a certain Species Class defined by the settings here.
Any name of Portrait Groups not listed in these files will not show up in the game. And definitely will not received greetings and insults according to their Species Class.
In 00_scripted_triggers.txt:
wears_clothesdefines if your species wears clothes. This will be referenced when an insult is made between nudists and clothed species.lithoids_portraitdefines if your species is Lithoids.necroids_portraitdefines if your species is Necroids.
Static portraits[編輯 | 編輯原始碼]
These are very simple, just create a .dds image, with a character cut out so it has no background. Save it somewhere in the \gfx folder.
Then add the portrait in the game \gfx\portraits\portraits\00_portraits.txt
portraits = {
	mam1 = {
		spriteType = "GFX_portrait_mam1"
	}
 }
or
portraits = {
	mam1 = {
		texturefile = "gfx/interface/portraits/YOUR_TEXTURE_NAME.dds"
	}
 }
Animated Portraits[編輯 | 編輯原始碼]
This guide will go over how to create a new portrait using Autodesk Maya, animating it and implementing it in the game.
Portraits in Stellaris are animated 2D characters. It works by having body parts split up on a texture map, assigning each body part to an individual polygonal plane, sorting them correctly in Maya and animating them using the skeleton feature.
To create an animated portrait, you will need a painting software like Adobe Photoshop, as well as Autodesk Maya 2015/2016. You will also need a plugin to export your texture to .dds. This can be done with the Photoshop plugin installed with the exporter. But we recommend downloading the Nvidia Photoshop .dds plugin (because it is simpler in this case).[1] The way this works is that when you 「export」 the file in Photoshop, it will save one file to your work folder and one file to the game folder. It can also be done manually, but then you have to copy the .dds file to the game folder.
Photoshop[編輯 | 編輯原始碼]
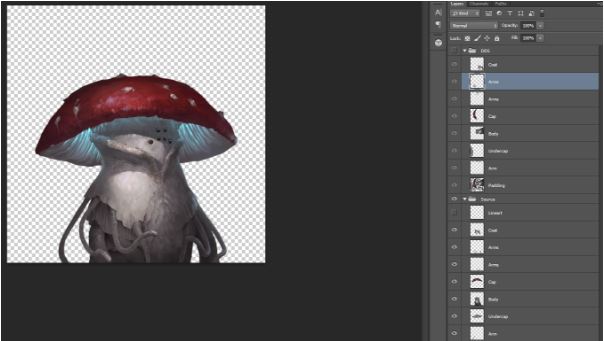
But, let’s start off, and take Fungoid 11 as an example. First create a texture of your alien. Separate the body parts that will be moving in different layers, and remember to paint behind any moving parts such as arms/tentacles/jaw/ears. The original should look something like Fig.1 (observe the amount of layers):
Fig.1: Source texture file of alien portrait
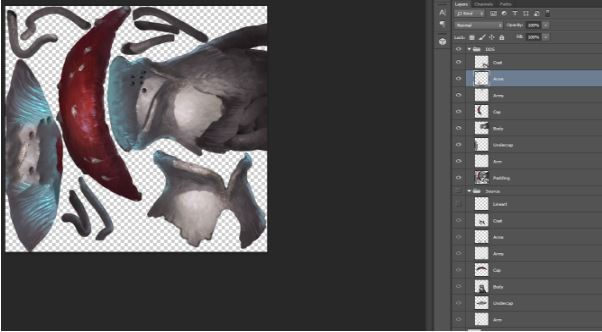
Next separate each layer and place them a few pixels away from each other like in Fig.2.
Fig.2: Body parts separated
Select all the separated layers, duplicate them, merge the duplicated layers, add the merged layer to the bottom of the folder, rename it to 「padding」 (this is to prevent alpha bleeding), ctrl-select the padding layer and go to 「Select > Modify > Expand」, expand it by around 5 pixels. Make sure that the expansion doesn’t connect to any other selection. Now we want to fill in the expanded area with the same colours as the body parts. This can either be done manually by painting in the area with the body parts』 colours or by using a plug-in that does it for you. A plug-in we have been using is the Free Plug-Ins from Flaming Pear found here: http://www.flamingpear.com/download.html (go to Free Plugins at the bottom), then in Filters, go to Flaming Pear, then Solidify A to fill the selection.
Now when our padding layer is done we want to create an alpha. This is done by ctrl+shift+selecting the layers, go to Channels tab in the layer window and clicking the 「Save selection as channel」 button at the bottom of the window.
Having our alpha created the texture file should be complete, however it is probably pretty large. Save your .psd file, then resize the image to 512x512 (don’t save the .psd file here!), save the file as a .dds with DXT5 settings and then ctrl+Z to get your original size back to your .psd.
Your texture should now be ready to be rigged in Maya.
Maya[編輯 | 編輯原始碼]
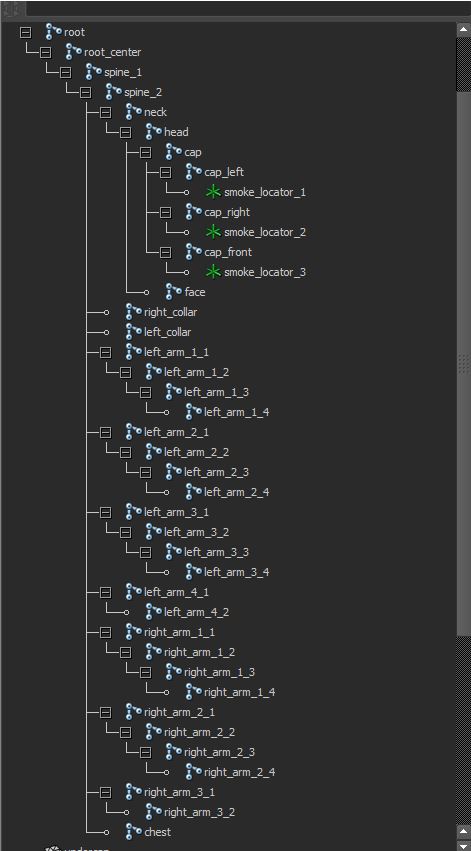
Open up Maya and start off by creating a new skeleton. See Fig.3 for joint hierarchy.
Fig.3: Joint hierarchy for Fungoid 11
You probably don’t need to create as many joints as can be seen in Fig.3 just yet, so start off by just creating the top ones: 「root」, 「root_center」, 「spine_1」. You can add more as you see fit depending on the design of your character.
Material[編輯 | 編輯原始碼]
Open up your .dds in Photoshop, open the image size window (^Ctrl+alt+i) and change the format from pixels to centimeters. The values here are the values we will use to create the polygonal planes in Maya. The Fungoid 11 texture file is 512x512 px which results in 18.06x18.06 cm.
Go to Maya and Create > Polygon Primitives > Plane > Option box. Set the axis to Z and then input 18.06 in both height and width. Now to create a proper material for it. Go to the Hypershader (Windows > Rendering Editors > Hypershader) and create a Phong material in the menu to your left. Assign the texture to the diffuse channel and assign a black texture to the normalmap and specular map channels. You can do this by assigning a file and never adding an actual texture. Assign the new material to the newly created plane. If your texture isn’t a perfect square you will need to go to the UV Editor and move the UV edge to the texture edge (however in the example of 512x512 it is a square).
Now duplicate your plane until you have one for each body part, like in Fig.4. Add more vertices to the planes and move each parts』 vertices to exclude the other parts (make sure you have "Preserve UVs" checked in the Move Tool settings) and place them above each other in the correct positions and order. It’s easiest to work in the front view. Put them in the same order in the outliner. The one furthest in the back should be at the top of the list and the one most in front at the bottom, this is to make the game know in which order to render them.
Fig.4: Polygon planes to map out the body parts
Animation[編輯 | 編輯原始碼]
To get better deformations on your mesh you should cut it up (add more splits) to get more polygons where the mesh will deform.
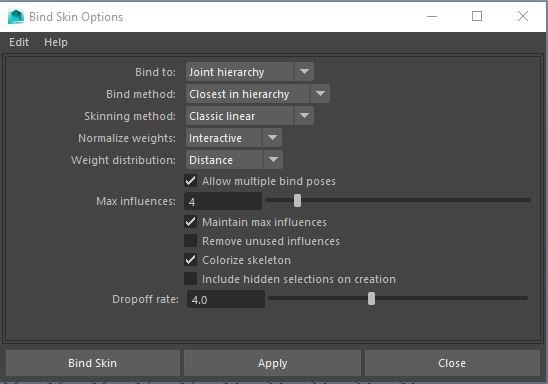
Now let’s continue to your skeleton, the skinning of the character, animating it and exporting it. If you have created the skeleton already with the structure which can be seen above you need to skin the meshes to it. To do this go to the "Rigging" menu in Maya > Skin > Bind Skin and press the options box. Make sure your settings looks like in the picture below, important is to have 4 max influences and uncheck "Remove unused influences".
Portrait skinning settings
When you have tweaked the skinning, by using the Paint Skin Weights Tool for each mesh, you need to animate it. First you need to give the root joint an animation attribute which will control where your animations start and where they end. To do this, select the root joint, open the export window and press "add animation attr." while having the correct exporting project selected (in which you might have a few animation strings already specified). This will add a new attribute to your joint which can be seen in the Channel Box. If you already had some animation strings in your Stellaris export project, in the clausewitz.txt file, these can now be found in the animation attribute on the root joint. You need to have at least one called "none" and one other with whatever name you prefer. If you don't have an animation called "none" you can add one manually if you select the root joint, go to "Modify" and select "Edit Attribute". In the new window, select the animation attribute and click on any slot under "Enum Names" to add a new state and name it "none".
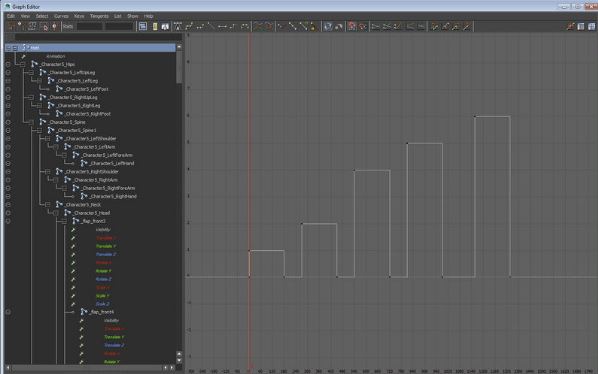
Now when you animate your character you need to set a key on the animation attribute on the root joint for where your animations start with "idle" (for example) and "none" where they end. If done correctly, it should look like in Fig.5, each pillar is an animation and the space between where the graph is on 0 value it is "none".
Fig.5: Graph of 「animation」 attribute for 「root」 joint
Shader[編輯 | 編輯原始碼]
For the body you should use the shader "PdxMeshPortrait", to use this select the shader your made previously in the Hypershader, then in the Maya exporter window select "Stellaris" and click "add shader attr." and select the mentioned shader in the drop-down menu at the bottom of the attributes in the channel box of the previously made shader (named Shader).
If the list doesn’t contain the Portrait shader, and only contains other kinds of shaders, you can either go to Documents\Paradox Interactive\PdxExporter\settings, open the clausewitz.txt file and add the shader you want to the list (remember to also increase the number at the start with 1 for each shader you add).
Alternatively you can select the shader in the Hypershader, go to Modify > Edit Attribute…, select 「shader」, click on the empty space below the shaders in the list, then write in the text box the name of the shader to add it. 「PdxMeshPortraitClothes」 for clothes and 「PdxMeshPortraitHair」 for hair. More on how to script clothes and hair later.
Export[編輯 | 編輯原始碼]
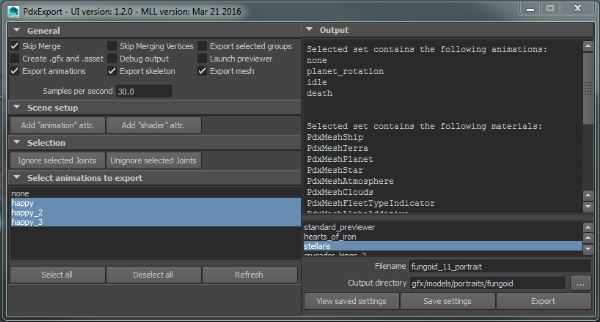
Open up the exporter, make sure you check the 「Skip Merge」 option in the exporter, see Fig.6 for options (normally the export optimizes the mesh by merging separate meshes, to reduce the amount of draw calls when rendering). Set a name and location and press export.
Fig.6: Portrait export options
How to add it to the game[編輯 | 編輯原始碼]
When you have exported, you need to add the animations manually. Each animation needs an entry in your .asset file (make sure the animations and .asset file is in the same folder).
animation = {
		name = "molluscoid_14_portrait_happy_animation" # <- this is the shortcut name that you will put in the .gfx file.
		file = "molluscoid_14_portrait_happy.anim" # <- this is the actual animation file name.
	}
	animation = {
		name = "molluscoid_14_portrait_happy_2_animation"
		file = "molluscoid_14_portrait_happy_2.anim"
	}
You will then need to add these animations in the .gfx file.
objectTypes = {
		pdxmesh = {
			name = "portrait_molluscoid_14_mesh"
			file = "gfx/models/portraits/molluscoid/molluscoid_14_portrait.mesh"
			animation = { id = "idle"	type = "molluscoid_14_portrait_happy_animation" }
			animation = { id = "idle2"	type = "molluscoid_14_portrait_happy_2_animation" }
			scale = 1.0
		}
 }
Then you will need to add these animations in .asset file with your character (can be the same file as the animations).
entity = {
	name = "portrait_molluscoid_14_entity"
	pdxmesh = "portrait_molluscoid_14_mesh"
	default_state = "idle"
	state = { name = "idle"		animation = "idle"	animation_blend_time = 0 chance = 2.0 looping = no next_state = idle}
	state = { name = "idle"		animation = "idle2"	animation_blend_time = 0 chance = 1.0 looping = no next_state = idle}
	scale = 1.12
 }
If you have many idle animations you can use this option to randomize the idle animations:
state = { name = "idle"		animation = "idle"	chance = 2.0 looping = no next_state = idle}
 state = { name = "idle"		animation = "idle2"	chance = 1.0 looping = no next_state = idle}
This will make the animation 「idle」 be twice as likely to play as the animation 「idle2」.
After you’ve done this it is time to add it to the phenotype list! To do this go to the file gfx/portraits/portraits/[##]_portraits_[phenotype].txt. In the bracket portraits = {} copy a portrait and change the numbers to whatever you want for your portrait. It should look like this:
mol14 = {
	 entity = "portrait_molluscoid_14_entity" clothes_selector = "molluscoid_massive_clothes_01" hair_selector = "no_texture"	greeting_sound = "molluscoid_01_greetings"
			character_textures = {
					"gfx/models/portraits/molluscoid/molluscoid_massive_14_1.dds"
					"gfx/models/portraits/molluscoid/molluscoid_massive_14_2.dds"
					"gfx/models/portraits/molluscoid/molluscoid_massive_14_3.dds"
					"gfx/models/portraits/molluscoid/molluscoid_massive_14_4.dds"
			}
	}
mol14 is the name of the portrait, entity is the entity it will use (which you created earlier), clothes_selector is which clothes to use (if none just write no_texture and hair_selector is for the hair it will use (if none just write no_texture).
In the bracket character_textures you can assign different textures. If you only have one you can still add it there by using its search path.
Next open the file 00_species_classes found in game \common\species_classes. Add your portrait name (like rep1) to the list of portraits under the correct phenotype. It should look like this:
FUN = {
	portraits = {
		"fun1"
		"fun2"
		"fun3"
		"fun4"
		"fun6"
		"fun7"
		"fun8"
		"fun9"
		"fun10"
		"fun11"
		"fun12"
		"fun13"
		"fun14"
		"YOUR_PORTRAIT"
	}

 graphical_culture = fungoid_01
	move_pop_sound_effect = "fungoid_pops_move"
 }
If you have clothes and hair you need to create a file where you can specify those. This file can be found in gfx/portraits/asset_selectors/[phenotype]_[size]_clothes_[##].txt
Copy one of the clothes files and change the textures to yours, then do the same to one of the hair files and change the textures.
Copy the file names and paste them in the gfx/portraits/portraits/[##]_portraits_[phenotype].txt file in the clothes_selector and hair_selector by replacing the no_texture string.
If it’s all correct it should now show up in the character designer.
Alternative: Non-intrusive Replacer[編輯 | 編輯原始碼]
This subsection is an innovative new method to add a new portrait into the game as a replacer, but in a non-intrusive way. This method should:
- Not change the checksum, thus preserving the allowing of Achievements
- Change the portrait of an existing portrait group, and the modded portrait only appears when the species name, or empire flag, matches a certain condition.
- Allow both the unmodded portrait and the modded portrait to coexist in the same game.
- Perform the above steps, but skip any change in the "common" folder.
- Instead, pick a vanilla portrait group to replace, and include a replacement file for that portrait class. In this example, we will use "Humanoid 2".
- Copy
\gfx\portraits\portraits\09_portraits_humanoid.txtinto your mod folder - Open the working copy (the one in your mod folder) and look for the
portrait_groupsblock. - Find
humanoid_02, and comment the whole block by adding a "#" in front of every line.- If using Notepad++, replace "\n" with "\n#" within the selection does the trick.
- Depending on the portrait group you have chosen to replace, choose the corresponding file. Some simple portraits don't have a portrait group, e.g. rep2, then you may skip this step.
- Go to your own Portrait file, which you have defined your own portraits and groups, add several triggers, checking the species name, to the blocks. A working example looks like this:
- Copy
portrait_groups = {
	mol14 = {
		default = batarian_male
		game_setup = {
			# will run with a limited country scope. species and government is set but the country does not actually exist
			add = {
				trigger = {
					ruler = { gender = male }
				}
				portraits = {
					batarian_male
					mol14
				}
			}
			# Omitted due to repetitive patterns
		}
		# species scope
		species = {
			# generic portrait for a species
			add = {
				trigger = {
					is_species = "Batarian"
				}
				portraits = {
					batarian_male
					batarian_female
				}
			}
			add = {
				trigger = {
					NOT = { is_species = "Batarian" }
				}
				portraits = {
					mol14
				}
			}
		}
		# pop scope
		pop = {
			# for a specific pop
			# Omitted due to repetitive patterns
		}
		# leader scope
		leader = {
			# scientists, generals, admirals, governor
			add = {
				trigger = {
					gender = female
					is_species = "Batarian"
				}
				portraits = {
					batarian_female
				}
			}
			# Omitted due to repetitive patterns
			add = {
				trigger = {
					NOT = { is_species = "Batarian" }
				}
				portraits = {
					mol14
				}
			}
		}
		# leader scope
		ruler = {
			# Omitted due to repetitive patterns
		}
	}
}
game_setupgoverns which portraits are added to the empire designer where you can choose the portraits for your first ruler. It has no bearing in the game.speciesandpopare very similar.speciesis about which portrait to display in the species screen, and which portraits to represent this species.popis about which portraits can be chosen for creating pops of this species.
leaderandrulerare scopes for creating leaders and rulers.
In the above example, the portrait remains as Molluscoid 14 whenever it is not named "Batarian". When it is named "Batarian", the corresponding batarian portraits will replace the portrait.
And in a game, an empire of Batarian and Molluscoid 14 can co-exist without conflicting each other.
A similar method can be used to only replace the portrait for a specific empire. Instead of asking for is_species, ask for has_country_flag. A working example is this:
trigger = {
				owner = {
					has_country_flag = "me_cerberus"
				}
				NOT = { is_species = "Husk" }
			}
This asks first the species name is not "Husk", and then it checks if the empire has the flag "me_cerberus".
- Then, you need to make a prescripted empire and include the lines:
flags = {
			"me_cerberus"
		}
- All subsequent empires saved out of this prescripted empire should inherit the flag, and therefore will trigger the portrait replacement.
See also[編輯 | 編輯原始碼]
References[編輯 | 編輯原始碼]
| 帝國 | 帝國 • 思潮 • 政府 • 國民理念 • 起源 • 承諾 • 議程 • 傳統 • 飛升天賦 • 法令 • 政策 • 遺珍 • 科技 • 自定義帝國 |
| 人口 | 崗位 • 派系 |
| 領袖 | 領袖 • 領袖特質 |
| 物種 | 物種 • 物種特質 |
| 行星 | 行星 • 行星特徵 • 軌道礦藏 • 建築 • 區劃 • 行星決議 |
| 星系 | 星系 • 恆星基地 • 巨型結構 • 蟲洞 • 星門 • 地圖 |
| 艦隊 | 艦隊 • 艦船 • 部件 |
| 地面戰 | 陸軍 • 轟炸姿態 |
| 外交 | 外交 • 聯邦 • 星海共同體 • 評價修正 • 宣戰理由 • 戰爭目標 |
| 事件 | 事件 • 異常現象 • 特殊項目 • 考古遺址 |
| 遊玩 | 遊玩 • 定義 • 研究 • 經濟 • 遊戲開局 |
| 動態修改 | 動態 • 指令效果 • 觸發條件 • 作用域 • 修正 • 變量 • AI |
| 媒體/本地化 | Maya 導出器 • 圖形 • 肖像 • 旗幟 • 事件圖片 • 界面 • 圖標 • 音樂 • 本地化 |
| Other | 控制台命令 • 存檔編輯 • Steam 創意工坊 • 模組製作教程 |
