This is an introductory modding tutorial for Stellaris. It covers steps necessary to create a basic mod.
Unless stated otherwise, every step assumes working on MS Windows.
Note: If you have a mod both as a local and as a workshop subscription game will refuse to load it.
Generate blank mod[编辑 | 编辑源代码]
You can get started creating a blank mod using either the Launcher to generate the starting files and directory, or doing so manually. Use the images below as a guide to creating a new mod with the Launcher, or skip down to the Manual section for instructions on creating the files yourself.
Launcher[编辑 | 编辑源代码]

Open Mod Tools
Paradox Launcher has a tab dedicated to mod management. Open it and select Mod Tools.
Select Create a Mod
All properly installed local mods can be found in the drop-down list. Select Create a Mod.
Fill in descriptor data
Every mod has a descriptor file which stores basic metadata about the mod, such as full name, version (just for modder's reference), local installation path, and tags. It is useful to use a mod folder name which reflects mod's arbitrary but unique prefix.
Done
Launcher will notify if mod has been created successfully. Any errors might indicate lack of space on a drive (usually partition C:) or insufficient write/read permissions (antivirus, file system permissions).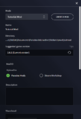
Ready for edits and upload
Newly created mod is displayed in the window upon selection in the drop-down list. This is where first mod uploads and updates are uploaded. Contents of Description window will be visible on the mod store page after upload. Note: Description and Thumbnail inputs in this window are not stored locally and can be lost. It is highly recommended to store description text file and thumbnail in mod root folder.


Manually[编辑 | 编辑源代码]
Above effect can be achieved without using Paradox Launcher. Every mod requires two descriptor files, each one in proper directory.
- First mod descriptor contains metadata and local path where the game (Paradox Launcher) should look for the mod. It must be placed in %USERPROFILE%\Documents\Paradox Interactive\Stellaris\mod\
- %USERPROFILE% is your system user profile folder (by default this point to the same location as C:\Users\%USERNAME%),
- mod is a Stellaris folder for local mods (as opposed to Steam Workshop mods), Other Stellaris folders are logs, save games, screenshots etc.
- Second mod descriptor contains just metadata and is stored in root (main) mod folder, which in the example would be %USERPROFILE%\Documents\Paradox Interactive\Stellaris\mod\tutmod\
- If Paradox Launcher was not used to create a mod one must create root mod folder manually.
- Root mod folder descriptor must be named descriptor.mod,
- Paradox Launcher uses second descriptor when it imports a mod from mod store (Paradox Mods, Steam Workshop). When a mod is downloaded for a mod store this descriptor file is copied from the mod root folder to the Stellaris mod folder and a local path is added.
Tip: You can paste %USERPROFILE%\Documents\Paradox Interactive\Stellaris\mod\ directly into the file explorer address bar without specifying user name.
Properly created mod has the following file structure on start:
- %USERPROFILE%\Documents\Paradox Interactive\Stellaris\mod\tutmod.mod
- %USERPROFILE%\Documents\Paradox Interactive\Stellaris\mod\tutmod\descriptor.mod
Example descriptor contents below.
| \mod\tutmod.mod | \mod\tutmod\descriptor.mod |
|---|---|
version="0.1"
tags={
	"Gameplay"
}
name="Tutorial Mod"
supported_version="2.8.1"
path="C:/Users/OldEnt/Documents/Paradox Interactive/Stellaris/mod/tutmod" |
version="0.1"
tags={
	"Gameplay"
}
name="Tutorial Mod"
supported_version="2.8.1"
|
Note how the only difference between two descriptor files is the path line.
| \mod\tutmod.mod | \mod\tutmod\descriptor.mod |
|---|---|


Tip: You can use masks (wildmarks) in the version string for descriptor files. Instead of writing:
supported_version="2.8.1"
you can use:
supported_version="2.8.*".
Launcher will recognise mod as up to date even when minor Stellaris patch is released. This has no effect on mod loading and the code, supported_version is merely a visual indicator.
Trivia: Some low level mods (like music or graphic) use also a wildmark for the second number (expanded support), which the launcher accepts (but throws an accusation entry in the error.log).
Modding tools[编辑 | 编辑源代码]
Tools checklist[编辑 | 编辑源代码]
- See also: Modding#Tools & utilities
There are many valuable tools available for free, including free and open source. This tutorial recommends installing the minimum:
- Notepad++ – Powerful and fast free and open source text editor, with tabs and split-window function.
Sublime Text – Powerful, moddable, hackable text editor. Install packages as your needs evolve.(not free and not that common anymore)
- Studio Code (VSC) – Professional-grade freeware code editor. Do not confuse with Visual Studio.
- CWTools – Paradox Games Language syntax database, freeware and open source, can be installed from within Visual Studio Code. Enables automatic checking if written code is valid.
- Paradox Syntax Highlighting – Colourful syntax highlight, makes code much more readable.
- WinMerge – Differencing and merging tool, free and open source. Contrasts the difference between two text files or folders.
- 7-Zip – Free and open source file archive manager.
- GIMP – Professional-grade free and open source image editor.
- Paint.net – Freeware software for digital image editing. GUI reminiscent of classic MS Paint.
- GitHub – Freeware code management and collaboration tools and services.
- Discord – Freeware instant messaging and VoIP platform, useful for connecting with other modders on Stellaris Modding Den.
- Irony Mod Manager – Launcher and mod manager with conflict solver for Paradox Games. More versatile and faster than Paradox Launcher. Free and open source.
- File Commander / Total Commander (Windows) – Powerful, moddable, hackable file manager.
All of the above is available for free on Windows, Linux, and macOS (except Paint.net, Notepad++ and GitHub, which have viable alternatives).
Setting up CWTools[编辑 | 编辑源代码]

CWTools is an extension which works with Visual Studio Code (VSC) and checks Paradox syntax on the go (as you write). It works with most games written for Clausewitz Engine (Stellaris being one of them). Some of the most useful features include:
- Highlighting of errors with tooltip on what is possibly wrong.
- Auto-completion of code, just press TAB when suggestion pops up while writing.
- Generating full list of missing localisation keys.
- Easy commenting and uncommenting of multiple lines. Right click > Command Palette > Toggle Line Comment.
- Auto-formatting of whole file: Right click > Format Document.
Installation steps:
- Download and install Visual Studio Code (VSC)
- When opened select File > Preferences > Extensions
- Click on "Search Extensions in Marketplace" search bar and type in "CWTools". Select "CWTools – Paradox Language Services" and click install in the right window.
- Repeat search for "Paradox Syntax Highlighting" and install it as well.
- Restart Visual Studio Code.
First steps[编辑 | 编辑源代码]
Preamble[编辑 | 编辑源代码]
While usually the best way to learn modding is to dissect a mod similar to what we want to achieve, this tutorial focuses on creating a mod from scratch.
We use Visual Studio Code as the primary code editor due to the powerful syntax checking function which CWTools extension grants.

Sources at hand[编辑 | 编辑源代码]
Following sources are invaluable to have at hand:
- Modding section of Stellaris Wiki
- List of Stellaris triggers, modifiers and effects, see GitHub page for comprehensive all-in-one list.
- Stellaris Modding Den Discord Server access for live help.
Mod content[编辑 | 编辑源代码]
Story-focused mods differ from mods introducing new gameplay mechanics or graphics components, but overlap almost always exists. This tutorial tries to touch as wide array of subjects as possible without delving into intricacies.
Game structure[编辑 | 编辑源代码]

- For full file structure refer to Modding page.
Stellaris stores most of the content in uncompressed folders easily accessible in its installation directory (SteamLibrary\steamapps\common\Stellaris\ for Steam installation). Modding the game requires overwriting the game files, part of game files, or adding new files next to existing ones, following folder structure and file naming the game uses (rules vary). Directly editing and adding files to game installation folder is highly discouraged. Use mod folder to overwrite or add content.
The most commonly changed contents are in:
- /common/ - bulk of game data and rules,
- /events/ - dictate when and how the game changes based on defined conditions,
- /localisation/ and /localisation_synced/ - text readable to player,
- /gfx/ - graphical components of the game,
- /interface/ - rules for use of graphical components and user interface design.
Every mod has to mirror structure of the installation folder. Mod containing localisation has to put all its language files on /localisation/, just as the game would.
Writing a first mod[编辑 | 编辑源代码]
\common\governments\civics[编辑 | 编辑源代码]
Example civic[编辑 | 编辑源代码]
- See also: Government modding
We will begin by creating a new civic. Civics and origins are stored in \common\governments\civics\. Origins are civics with a few changes.
An example civic code (\common\governments\civics\00_civics.txt):
civic_beacon_of_liberty = {
 	potential = {
 		ethics = { NOT = { value = ethic_gestalt_consciousness } }
 		authority = { NOT = { value = auth_corporate } }
 	}
 	possible = {
 		authority = {
 			value = auth_democratic
 		}
 		ethics = {
 			OR = {
 				text = civic_tooltip_egalitarian
 				value = ethic_egalitarian
 				value = ethic_fanatic_egalitarian
 			}
 			NOR = {
 				text = civic_tooltip_not_xenophobe
 				value = ethic_xenophobe
 				value = ethic_fanatic_xenophobe
 			}
 		}
 	}
 	random_weight = { base = 5 }
 	modifier = {
 		country_unity_produces_mult = 0.15
 	}
 }
Let us breakdown the civic:
| civic_beacon_of_liberty | civic key, used to reference it in the code, including localisations |
| potential | conditions for civic to be available for choice |
| possible | conditions for civic to be a valid choice |
| random_weight | determines likelihood of appearing for a randomly generated empire. If two civics exist and both have a weight of 5 then chances are 50:50. |
| modifier | direct effects of a civic on an empire. More complex way is to use events checking for a civic and executing effects. |
This specific civic has localisation key civic_beacon_of_liberty, is a potential choice only for empires which a) ethics are NOT gestalt and b) do NOT have authority corporate.
Any empire which meets the above criteria will have the civic as a choice, but it is possible to take the civic only if a) authority EQUALS democratic and b) ethics are EQUAL to egalitarian OR EQUAL to fanatic egalitarian, and NEITHER are equal to xenophobe or fanatic xenophobe.
Note how text = function is used to invoke a custom tooltip instead of automatically generated one. This is usually not needed but can be useful.
This civic has an absolute weight of 5 for the purpose of galaxy generation. If there are two other civics of weight 45 and 50, then the civic in question would have only 5% chance of appearing on a randomly generated empire, in principle (45 + 50 = 95 vs 5).
The civic gives the country a modifier of +15% Unity production.
Civic definitions do not support complex conditions but it is worth to familiarise yourself with how logical operators work.
Custom civic[编辑 | 编辑源代码]
| Folder | File | Content |
|---|---|---|


| CWTools suggestion | TAB | Repeat |
|---|---|---|


Let us write a code of the new civic using civic_beacon_of_liberty as a reference.
Code formatting[编辑 | 编辑源代码]
Note how you can comment out a part of code using # sign. Anything after # in a specific line will not be read by the game.
We will now make our own code by swapping out parts we do not like and inject our own.
First, let us remove auth_corporate exclusion and add a comment on ethic_gestalt_consciousness exclusion.
# civic_beacon_of_liberty = {
 tutmod_civic = {
 	potential = {
 		ethics = {
 			NOT = {
 				value = ethic_gestalt_consciousness
 			}
 		}
 		# authority = {
 		# 	NOT = {
 		# 		value = auth_corporate
 		# 	}
 		# }
 	}
 	possible = {
 		authority = {
 			value = auth_democratic
 		}
 		ethics = {
 			OR = {
 				text = civic_tooltip_egalitarian
 				value = ethic_egalitarian
 				value = ethic_fanatic_egalitarian
 			}
 			NOR = {
 				text = civic_tooltip_not_xenophobe
 				value = ethic_xenophobe
 				value = ethic_fanatic_xenophobe
 			}
 		}
 	}
 	random_weight = {
 		base = 5
 	}
 	modifier = {
 		country_unity_produces_mult = 0.15
 	}
 }
Adding content[编辑 | 编辑源代码]
We are adding an additional condition for ethics.
OR = {
	text = civic_tooltip_materialist
	value = ethic_materialist
	value = ethic_fanatic_materialist
}
The code should now look like below:
# civic_beacon_of_liberty = {
 tutmod_civic = {
 	potential = {
 		ethics = {
 			NOT = {
 				value = ethic_gestalt_consciousness # No gestalt.
 			}
 		}
 		# authority = {
 		# 	NOT = {
 		# 		value = auth_corporate
 		# 	}
 		# }
 	}
 	possible = {
 		authority = {
 			value = auth_democratic
 		}
 		ethics = {
 			OR = {
 				text = civic_tooltip_materialist
 				value = ethic_materialist
 				value = ethic_fanatic_materialist
 			}
 			OR = {
 				text = civic_tooltip_egalitarian
 				value = ethic_egalitarian
 				value = ethic_fanatic_egalitarian
 			}
 			NOR = {
 				text = civic_tooltip_not_xenophobe
 				value = ethic_xenophobe
 				value = ethic_fanatic_xenophobe
 			}
 		}
 	}
 	random_weight = {
 		base = 5
 	}
 	modifier = {
 		country_unity_produces_mult = 0.15
 	}
 }
To be a valid choice an empire has to be to some degree materialist, to some degree egalitarian, and neither xenophobe nor fanatic xenophobe. We did not have to worry about creating civic_tooltip_materialist localisation because it already exists in the game files.
Localisations[编辑 | 编辑源代码]
Localisation files[编辑 | 编辑源代码]
:
Useful console commands:
reload text – reloads localisation table.
switchlanguage english – switches used language and reloads localisation table.
CWTools highlights keys which are missing localisations, you can see full list of potential issues at the bottom of VSCode window:
Localisation key tutmod_civic is not defined for English
Localisation key tutmod_civic_desc is not defined for English
We need to create a localisation folder structure. Create \localisation\english\ folders inside root mod folder first, and then create tutmod_l_english.yml. VSCode will automatically encode file in UTF8 with BOM which Stellaris localisation files need. Both VSCode and Notepad++ are able to easily change file encoding if needed.
Localisation files require language declaration in the first line. Simply write:
l_english:
Supported language declarations are:
braz_por
english
french
german
polish
russian
simp_chinese
spanish
We have file prepared. Switch back to tutmod_civics.txt tab, right mouse click > Command Palette > Generate missing loc for all files. Copy generated strings into loc file.
We will fill the placeholders with the following information:
l_english:
 tutmod_civic: "Semper Exploro"
 tutmod_civic_desc: "This society prioritised scientific exploration over military expansion in the early space age."
 tutmod_civic_effects: "Start with a $science$ and assigned $scientist$ instead of $OUTLINER_FLEETS$."
Note the $ signs which can be used to refer to other localisation key, be it existing in game or modded one. You can view vanilla keys directly in SteamLibrary\steamapps\common\Stellaris\localisation\english\ .
Due to the way Stellaris localisations work, there is no way to set up a fallback localisation for other languages to use. If you generate localisations for English only, users playing the game in other language will see a raw key name, ie. tutmod_civic. We have to copy the localisation file \localisation\english\tutmod_l_english.yml to the corresponding language folders, change file name, and adjust language declaration at the beginning of the file:
\localisation\english\tutmod_l_braz_por.yml
\localisation\english\tutmod_l_english.yml
\localisation\english\tutmod_l_french.yml
\localisation\english\tutmod_l_german.yml
\localisation\english\tutmod_l_polish.yml
\localisation\english\tutmod_l_russian.yml
\localisation\english\tutmod_l_simp_chinese.yml
\localisation\english\tutmod_l_spanish.yml
With an example tutmod_l_braz_por.yml containing:
l_braz_por:

 tutmod_civic:0 "Semper Exploro"
 tutmod_civic_desc:0 "This society prioritised scientific exploration over military expansion in the early space age."
 tutmod_civic_effects:0 "Start with a $science$ and assigned $scientist$ instead of $OUTLINER_FLEETS$."
Advantage of using $ signs to reference other keys is that we do not have to translate string multiple times, game will automatically pull the content for the language user plays on. This might not always result in a grammatically correct sentence, it usually works best with the key being used in nominative case.
Custom tooltips[编辑 | 编辑源代码]
Game automatically generates localisations for things like tooltips based on effects in the game. For civics it means we do not have to write what effect civic has, as the game will pull all modifiers we wrote and generate sentences, ie. having below in civic definition:
modifier = {
 	country_unity_produces_mult = 0.15
}
will result in the following in the effects tooltip:
Monthly Unity: +15%
Sometimes we want to add a text for more effects. We will reference tutmod_civic_effects in the tutmod_civics.txt file for tutmod_civic and swap modifier while we are at it.
# modifier = {
# 	country_unity_produces_mult = 0.15
# }
description = "tutmod_civic_effects"
modifier = {
	ship_science_cost_mult = -0.25
}
Tutorial civics file should now look as below:

# civic_beacon_of_liberty = {
tutmod_civic = {
	potential = {
		ethics = {
			NOT = {
				value = ethic_gestalt_consciousness # No gestalt.
			}
		}
		# authority = {
		# 	NOT = {
		# 		value = auth_corporate
		# 	}
		# }
	}
	possible = {
		authority = {
			value = auth_democratic
		}
		ethics = {
			OR = {
				text = civic_tooltip_materialist
				value = ethic_materialist
				value = ethic_fanatic_materialist
			}
			OR = {
				text = civic_tooltip_egalitarian
				value = ethic_egalitarian
				value = ethic_fanatic_egalitarian
			}
			NOR = {
				text = civic_tooltip_not_xenophobe
				value = ethic_xenophobe
				value = ethic_fanatic_xenophobe
			}
		}
	}
	random_weight = {
		base = 5
	}
	description = "tutmod_civic_effects"
	modifier = {
		ship_science_cost_mult = -0.25
	}
	# modifier = {
	# 	country_unity_produces_mult = 0.15
	# }
}
Logs[编辑 | 编辑源代码]
game.log[编辑 | 编辑源代码]
We can use the following effect to output any string into the game.log:
log - Prints a message to game.log for debugging purposes
log = <string>
Supported Scopes: all
This is where most modders output data if they want to check how their mod works, it is especially useful for debugging event scripts. Note: it has been observed that individual instance of log effect in a code executes and writes to game.log only once per day, this is most likely to prevent log spam.
error.log[编辑 | 编辑源代码]
Game logs are stored in \Documents\Paradox Interactive\Stellaris\logs\. Modders use mostly error.log and game.log to debug the game. Start the game with the tutmod loaded and open error.log. You will find one line which references to tutmod (search mod prefix to quickly find relevant information):
[18:22:15][government_civic_type.cpp:185]: Did not find an icon for civic: tutmod_civic
We can use the following effect to output any string into the error.log (also see notes about game.log):
log_error - Prints a message to error.log for debugging purposes.
Supported Scopes: all
For now all we need to know that there is an icon missing for tutmod_civic.
Note: Game stops logging before the crash, error.log is therefore almost always useless in finding the crash cause. Crash data is stored in \Documents\Paradox Interactive\Stellaris\crashes\ and is useful only to the Stellaris developers.
EXE parameters[编辑 | 编辑源代码]
There are some special options for the stellaris.exe you can input to improve your logging/debugging:
-script_debug	- (Can ignore)
 -debug_mode	- Extra logging
 -debugtooltip	- Starts first game you enter with debugtooltip
 -logprefix		- Modifies each log file with the set prefix
 -logpostfix	- Modifies each log file name with the set postfix
 -logall		- Logs no longer fail to log duplicate string values
Events[编辑 | 编辑源代码]
fire_only_once[编辑 | 编辑源代码]
Event is a script which changes state of the game by using effects, provided triggers are met and event was called.
Create a new \events\tutmod_events.txt file.
Every events file has to have at least one namespace declared at the beginning. We use:
namespace = tutmod
It is a good practice for any mod which affects gameplay (changes checksum) to notify its presence to other mods. The commonly accepted way is to set up a global_flag other mods can check if it exists via effect:
set_global_flag - Sets an arbitrarily-named global flag
set_global_flag = <key>
Supported Scopes: all
Example file would look like the following:
namespace = tutmod
country_event = {
	id = tutmod.1
	hide_window = yes
	fire_only_once = yes
	trigger = {
		NOT = {
			has_global_flag = tutmod_installed
		}
	}
	immediate = {
		set_global_flag = tutmod_installed
	}
}
namespace = tutmod– declares namespacecountry_event = {}– declares event of country scope, it is also name of an effect used to call an event.id = tutmod.1– declares unique id of the event. Consists of namespace and number, separated by a stop.hide_window = yes– a popup window for player will not be created. This is how most events in the game work.fire_only_once = yes– successfully fired event (called and met trigger conditions) will be added to blocklist and will never be used again in current game.trigger = {}– contains list of conditions (triggers) which have to be met in order for called event to fire. Default this/root scope is defined by name of event scope (country_event here).immediate = {}– contains list of effects which change the state of the game when event fires.
This event does not contain the is_triggered_only = yes declaration. This means event will be checked DAILY for EVERY country. If the event was of different scope, ie. pop_event, it would check for EVERY pop in the game DAILY. With a galaxy of 5000 pops it would mean 5000 checks every day. It is a very resource intensive way of scripting and therefore you should always add is_triggered_only = yes, unless there is a good reason not to. is_triggered_only = yes blocks event from checking itself and will require it to be called from elsewhere (more on that below).
We can limit checking of the event by using the aforementioned fire_only_once = yes. Event still checks daily for every country, but as soon as the first country fires the event it will be blocklisted and no longer checked. Since the conditions of the event are simple (NOT = { has_global_flag = tutmod_installed }) event will fire as soon as game starts.
Specific trigger used in trigger section is:
has_global_flag - Checks if a Global Flag has been set
has_global_flag = <flag>
Supported Scopes: all
Immediate section is self-explanatory. It contains a single effect:
set_global_flag - Sets an arbitrarily-named global flag
set_global_flag = <key>
Supported Scopes: all
This country event is read as the following by the game: Every country must check daily conditions of tutmod.1 event which are "global_flag tutmod_installed has NOT been set". If true set_global_flag = tutmod_installed, then add event to blocklist.
is_triggered_only[编辑 | 编辑源代码]
As a general rule every event should have is_triggered_only = yes declared. This makes game not checking the event until it is specifically called by an effect or on_action. Below is a code for the second tutmod event (should be written in \events\tutmod_events.txt):
# Removes military fleets, grants science ship and scientist.
# Scopes:
# Scope: root: country this: country
country_event = {
	id = tutmod.2
	hide_window = yes
	is_triggered_only = yes	# Fire only when called from elsewhere.
	trigger = {
		has_civic = tutmod_civic		# Must have tutmod_civic civic.
	}
	immediate = {
		every_owned_fleet = {
			# Iterate through every owned fleet of THIS country.
			limit = {
				is_ship_class = shipclass_military # only fleets meeting shipclass_military criteria
			}
			delete_fleet = {
				target = this				# Delete THIS fleet.
				kill_leader = no			# Do not delete leader of THIS fleet (unassigns).
			}
		}
		create_leader = {
			# Create leader for THIS country.
			class = scientist # Specified scientist class.
			species = this # Where THIS is the scope of where effect was written in (country, therefore species will be main country species).
		}
		create_fleet = {
			# Create fleet for THIS country.
			effect = {
				# Execute list of effects for THIS fleet.
				set_owner = prev # Set owner of THIS fleet to PREV (PREV/previous scope being country we in previous brackets refered to as THIS).
				create_ship = {
					# Create ship for THIS fleet.
					random_existing_design = science # of random design which is science ship.
					graphical_culture = owner # Visual style of the ship is the same as OWNER of the fleet (can use PREV here).
				}
				set_location = {
					target = owner.capital_scope.solar_system.starbase # Set location of the fleet to owner's capital_scope's solar_system's starbase.
					# distance = 0
					# angle = random
					# direction = out_system
				}
				assign_leader = last_created_leader # Assigns last created leader to the fleet.
			}
		}
	}
}
Code is more readable in VSCode.
This event has only one trigger which checks if the country has_civic = tutmod_civic.
There are several effects in the immediate section. Most of them are self-explanatory. All of them are listed on the effects list and it is worth reviewing them.
Scopes[编辑 | 编辑源代码]
:
- 主条目:Scopes
Let us analyse scope operators used.
create_fleet = {
	effect = {
		set_owner = prev
		create_ship = {
			random_existing_design = science
			graphical_culture = owner
		}
		set_location = {
			target = owner.capital_scope.solar_system.starbase
		}
		assign_leader = last_created_leader
	}
}
In the code create_fleet is called directly in country_event = { immediate = {. This means THIS scope of the effect will refer to the country event was fired for.
root = country
this = country
Inside create_fleet effect we call a series of effects using effect block. Now, inside effect block, THIS scope operator will refer to this fleet (because it was called inside THIS fleet).
root = country
this = fleet
prev = country
Note how we can switch back to previous scope by using PREV scope operator.
effect = {
	set_owner = prev
Effect set_owner is called inside THIS fleet and targets PREV, which is country.
Common[编辑 | 编辑源代码]
on_actions[编辑 | 编辑源代码]
- See also: Event modding#On Actions
We mentioned how events can be called from effects and on_actions. We can call events on_game_start to assure proper set up for the empire with tutmod_civic. Simply create \common\on_actions\tutmod_on_actions.txt file and declare events which should fire.
on_game_start_country = {
	events = {
		tutmod.1
		tutmod.2
	}
}
GFX[编辑 | 编辑源代码]

All graphical assets are stored inside /gfx/ folder. Civics icons should be placed specifically in \gfx\interface\icons\governments\civics\ .
We need to create a tutmod_civic.dds which is 28x28 (resolution for civics icon). For the purpose of this tutorial we will use a blank template gratuitously donated to and available on Stellaris Modding Den Discord Server in the #shared-art channel.
\gfx\interface\icons\governments\civics\tutmod_civic.dds
GIMP and Paint.net are two very good tools commonly used to create Stellaris assets.
Testing a mod[编辑 | 编辑源代码]
Any trigger, effect or event can be tested from the console while in game. Console will accept any valid script input, as long as it is proceeded by the declaration of what it is (trigger, effect or event).
Console executes script on a scope which is currently selected (planet, fleet). To select empire scope open government menu. Scoping to unclickable objects might require additional scope operators in script.
We can check if an empire has a tutmod_civic by clicking on the empire flag and executing the following trigger script:
trigger OR = { has_civic = tutmod_civic has_valid_civic = tutmod_civic }
- has_civic checks if the current country has the specified civic,
- has_valid_civic checks if the current country has a certain civic and if its validated (performs additional check if country fulfils criteria of a given civic).
In practice we check only against one of the above triggers as has_civic makes has_valid_civic redundant when used.

We can also execute effects in the same way. Let us count ships of an empire and store value in a selected object, ie. planet. Click on a homeworld planet and execute the following:
effect owner = { every_owned_ship = { prevprev = { change_variable = { which = tutmod_var_num_ships value = 1 } } }
where:
owner = {}– scope operator, jumps from selected scope to the owner of selected scope (in the example from planet to a planet owner),every_owned_ship = {}– iterates through each ship in the fleet or owned by the country and executes effects. We have omitted limit triggers because we want to iterate through all,prevprev = {}– scope operator, while executed insideevery_owned_shipeffects it will jump back (prev) two times (prevprev), fromevery_owned_shiptoownerand fromownerto a scoped homeworld planet where effect was executed on.change_variable– change the named variable by a given amount in a given scope.
To view a value we can either open up a save or use debugtooltip command and hover over an object to display flags and variables stored in it.

Note: Console accepts pasted in input, even if it contains multiple lines. It does not show it properly but it does execute it.
Git repository[编辑 | 编辑源代码]
Git is a version control system, it is used primarily in software development. It tracks changes to files and helps in collaboration. With Git repository set up you can:
- Track and revert changes to your mod to any point prior.
- Share code, including links to specific lines with ease.
- Generate release packages from specific repository revisions, for the ease of download.
- Allow others to propose tweaks to your code with ease, which you can accept and merge in with a press of a button.
For the purpose of this tutorial we use popular GitHub which offers free hosting service:
- Create a folder specifically for GitHub repositories, ie.
G:\GitHub\ - Clone your mod folder to the above GitHub repositories folder. Rename cloned folder to something recognisable online if you want, in the example we rename
G:\GitHub\tutmod\toG:\GitHub\tutorial-mod-stellaris\. - Create GitHub account on GitHub homepage.
- Download and install GitHub desktop client (available for Windows and Mac, Linux has distro-specific clients you can look into).
- Open GitHub desktop client and login to your account (File > Options > Accounts). This is not strictly necessary but will allow you to push code to online repository. Further steps assume this is the case.
- File > New Repository.
| Create | Preview initial commit | Publish | Available online |
|---|---|---|---|
 Repository is now available online. Pictured example can be accessed at https://github.com/OldEnt/tutorial-mod-stellaris . |


Any changes to the repository simply require adding, removing or changing files in the repository folder. GitHub program monitors folder for any changes and will allow for update push if those are detected. Change of the code state is called a commit.
External links[编辑 | 编辑源代码]
- Stellaris Dev Diary #182: The Perils of Scripting and How to Avoid Them – written by Caligula, Stellaris Content Designer
References[编辑 | 编辑源代码]
| 帝国 | 帝国 • 思潮 • 政府 • 国民理念 • 起源 • 承诺 • 议程 • 传统 • 飞升天赋 • 法令 • 政策 • 遗珍 • 科技 • 自定义帝国 |
| 人口 | 岗位 • 派系 |
| 领袖 | 领袖 • 领袖特质 |
| 物种 | 物种 • 物种特质 |
| 行星 | 行星 • 行星特征 • 轨道矿藏 • 建筑 • 区划 • 行星决议 |
| 星系 | 星系 • 恒星基地 • 巨型结构 • 虫洞 • 星门 • 地图 |
| 舰队 | 舰队 • 舰船 • 部件 |
| 地面战 | 陆军 • 轰炸姿态 |
| 外交 | 外交 • 联邦 • 星海共同体 • 评价修正 • 宣战理由 • 战争目标 |
| 事件 | 事件 • 异常现象 • 特殊项目 • 考古遗址 |
| 游玩 | 游玩 • 定义 • 研究 • 经济 • 游戏开局 |
| 动态修改 | 动态 • 指令效果 • 触发条件 • 作用域 • 修正 • 变量 • AI |
| 媒体/本地化 | Maya 导出器 • 图形 • 肖像 • 旗帜 • 事件图片 • 界面 • 图标 • 音乐 • 本地化 |
| Other | 控制台命令 • 存档编辑 • Steam 创意工坊 • 模组制作教程 |